

Okay, stop shuddering. They are a lovely vegetable high in *taps her lips looks around and resists googling the veggie* ah, something good for you. Don't take my word for it. Google it for yourself. Iron I was just informed by a fellow writer. Another writer ventured as colorful as they are they must be high in antioxidants with 'I think' also. So thanks! As you see we are a very informed group.
Last year the beets I grew went into a lovely risotto with cheese and bright red baked beets.
My Mom wanted beets with onions like her mom used to make. I learned to can from two of my aunts when I was a teenager. My Aunt Yolande and Aunt Joan both spent hours teaching me how to properly put up all a manner of vegetables and fruits. Jams were something I had down by my teen years and still make plum jam with the fresh plums from the tree in our yard.
So when Mom asked if I'd make her beets I began to do my research. I wasn't interested in half the recipes because they had funky ingredients and spices I didn't think my mom would like. I read a half dozen or so recipes that looked good and adjusted for what mom remembered. First thing to know this is NOT a fast recipe. You won't be doing this in under two hours. I can see how to make it over two days but plan on at least a few hours.
Pickled Beets and Onions
Ingredients:
- 7 to 8 pounds of beets
- 4 cups vinegar (5% acidity I used white)
- 1 1/2 teaspoons canning or pickling salt (I used sea salt)
- 2 cups sugar
- 2 cups water
- 2 cinnamon sticks
- 12 whole cloves (about 1 teaspoon)
- 12 allspice nuts (whole again about 1 teaspoon)
- 4 to 6 white onions (2 1/2 inch diameter)

Assorted tools and pots needed:
- One very large pot (I used stainless steel because beets stain)
- Large spoons and ladle (I like to use a wide mouth funnel for filling the jars)
- Ball Jars (I used both wide mouth and smaller since beets were conical type not as thick as classic beets) with lids and rings (new lids always!)
- Jar grabber (trust me you don't want to pick up the hot jars)
- Water bath canner (I got mine at Ace Hardware but they are in country stores and online)
I don't know how to pressure can but some swear by it because it does reduce the time. Consult an expert. Not me!
I also had on hand forks and tons of paper towels and newspapers. If you are a green person you can use old clean clothes instead and have a cool red tie-dye effect. Gloves -- latex or whatever disposable kind you have. Yeah, the kind used for painting and crafts work.
Remember this is a very staining process. Don't have on your favorite clothes/shoes/skin. Rugs in the kitchen should be moved and your pretty china knickknack moved out of splash zone. Have I said that enough yet? Not to say you will be messy but the process is a tad busy and the liquids boiling hot.
Step by Step Directions
Step 1 - Selecting the beets
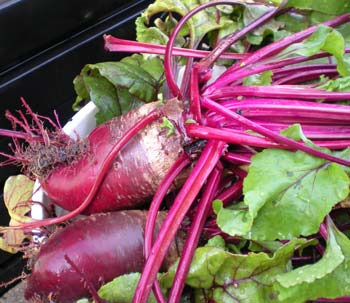
An important first step! FRESH and crisp beets. Limp, old beets will make bad canned beets. Select firm, crisp beets. Remove all spots and icky bits. You can grow your own, pick your own, or buy them at the grocery store. About 7 pounds of 2- to 2 1/2-inch diameter beets makes about 8 pints of pickled beets. I took a guess on the amounts based on the fact I had them in my garden. What I had was what I made.
Step 2 - Prepare the jars and canner and wash the jars
I run them through the dishwasher on the top rack. I have used them in the bottom rack also. Make sure to leave them in until you are ready to fill so they stay clean.
Get the canner heating up because it takes forever to bring to boil!
Canners are large and I use hot water to start after I rinse it out. I put the lid on once I have the rack in place. Put it on the stove over low heat just to get it heating up for later on so it won't delay the process. Water needs to cover the jars by an inch when filled so I usually put the kettle on to top off the water if needed.
Step 3 - Trim the beets
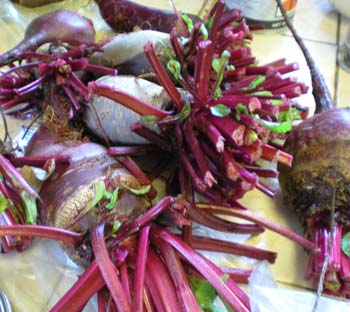
Just take a sharp knife and trim off beet tops, leaving an inch of stem and roots to prevent bleeding of color. The color still going to leach out but it at least makes it reasonable.
Step 4 -Wash the beets
Scrub the beets in plain cold or lukewarm water using your hands or a vegetable brush. Dirt does not add to the flavor. Really.
Step 5 - Cook the beets -- yeah I know ... a big duh!
Put similar sized beets (I used two different pots because mine were different sizes from the garden) together with enough boiling water to cover them and cook until tender (usually about 30 to 45 minutes in an open pot and definitely smells). Drain and discard the liquid. Make sure to pour into sink carefully, it will stain.
Step 6 - Cool the beets with ice (or shove in fridge and sleep and start up here tomorrow in which case turn off the canner and shut the dishwasher)
I poured cool water and added ice to the stainless steel bowls. All you are trying to do is to cool them enough so you can handle them to remove the skins, stems, roots and then slice them.
Step 7 - Trim, peel and slice (here's where I used gloves and newspapers)
Trim off the roots and stems. The skins should easily slide off. Slice the beets into 1/2 to 1/4-inch slices. You can leave the beets whole if they are little, but I don't see the reason. Slicing helps you fit more in the jars and lets the seasoning penetrate them better.
Step 8 - Slice the onions.
If you like onions in the mix, peel and thinly slice the onions. My mom says next time I need to put these in later and larger hunks. Her mom added them before canning not into the beet mixture.
Step 9 - Make the Pickling Solution
Combine the vinegar, salt, sugar and fresh water in a large pot. Put the spices in cheesecloth bag and add to vinegar mixture. Bring to a boil.
Step 10 - Heat the mixture with the beets and onions
Add beets and onions to the pot and simmer for 5 minutes. Then remove the spice bag.

Step 11 - Packing the beets in the canning jars
This is called "hot packing" for a reason. Be very careful. Fill the jars with beets and onions, leaving 1/2-inch space at the top. Pack the jars fairly tightly, but be sure to leave 1/2-inch of space at the TOP of the jar. It is needed for expansion during heating in the water bath.
Step 12 - Pour boiling cooking liquid into each packed jar
I used a ladle but you can use a pyrex measuring cup to carefully fill each packed jar with the hot vinegar solution, again leave the 1/2-inch space at the top. The beets should be covered and there should still be 1/2 inch of airspace left in the top of each jar. Be careful not to burn yourself this is boiling liquid. I then wipe off the top of the glass jar to get a clean seal.
Step 13 - Put the lids and rings on
Put the lids (I pour boiling water on top of the lids before I do this because it helps the seal then remove with fork) on each jar and completely seal them by putting a ring on and screwing it down snugly -- not too tight.
Step 14 - Put the jars in the canner and the lid on the canner
Using the jar tongs, put the jars on the rack in the canner; this is a balancing act and remember that water is hot. Make sure the tops of the jars are covered by at least 1 inch of water. If you need to, add additional boiling water to cover.
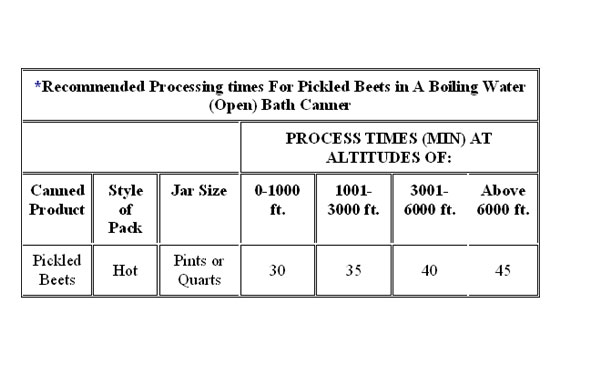
Step 15 - Process for 30 minutes*
For most people, using a plain open water bath canner, the time will be 30 to 35 minutes. You can use either a plain water bath canner OR a pressure canner, since the vinegar adds so much acidity (I can't help you on that one ask an expert!)
*
Step 16 - Remove the jars
Lift the jars out of the water and let them cool in a draft-free place, on a wooden cutting board or a towel, without touching or bumping them (usually takes overnight).
Once the jars are cool, you can check that they are sealed, verifying that the lid has been sucked down. Just press in the center, gently, with your finger. If it pops up and down (often making a popping sound), it is not sealed.
If it's not sealed, you can put the jar in the refrigerator right away: you can still use it. But it won't be sealed properly and needs to be kept in fridge and eaten soon.
The Piker Press moderates all comments.
Click here for the commenting policy.